What is Garmin BaseCamp?
Garmin BaseCamp is a free mapping program available as a download from the Garmin website. We use Garmin BaseCamp to transfer our snowmobile and ATV trail maps, routes and waypoints to your GPS device. BaseCamp lets you plan snowmobile and ATV trips then replay your rides, display geotagged photos and share it all with your friends. With BaseCamp, you can manage your waypoints and tracks on your computer for future trip planning.
Plan a snowmobile or ATV ride
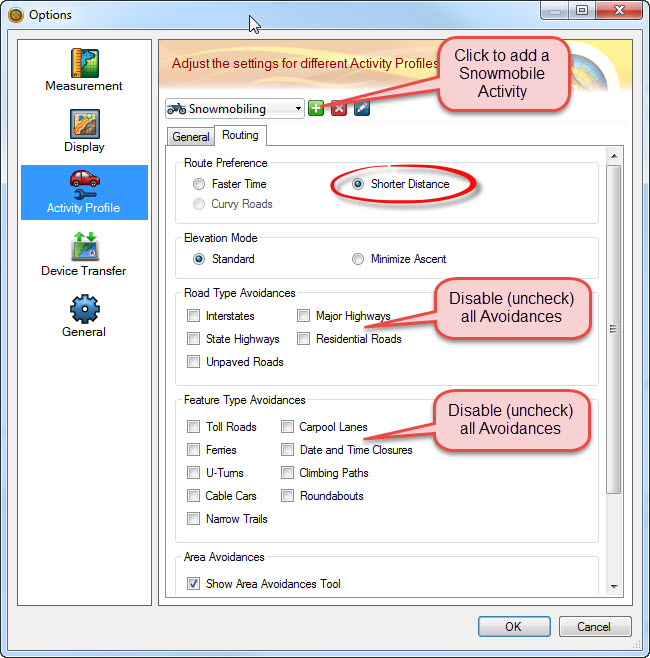
Planning a trip with BaseCamp is quick and easy. Plan a quick loop or a multi-day expedition. Calculating distance between food and gas is a breeze. Before planning your first trip you should setup an activity and then set the routing preferences. Select the Edit -> Options menu. Select the "Activity Profile" options. You will notice in the pulldown that BaseCamp provides a default ATV activity but not one for snowmobiling. That’s ok, we can create one. To add a new activity, click the green + box next to the activity pulldown. Enter the name “Snowmobile”. If you have your own snowmobile image you can download it for your new activity type. Now you can set routing preferences for both your ATV or Snowmobile activity by selecting the Routing tab. The Route Preference attribute should always be set to “Shorter Distance” and NO Avoidances should be checked off. These routing settings should be replicated on your actual GPS as well. The Speed Customization section does not apply to your GPS trail maps.
NOTE: Setting routing preferences in BaseCamp does not effect the Routing preferences on your GPS. Routing preferences for the GPS must be set on the GPS itself, however a route created in BaseCamp and transfered to your GPS will not be recalculated based on GPS settings, it will remain as calculated in BaseCamp. You do not need to create/use special ATV and Snowmobiling activities, it's simply a way to organize your activity profiles. What's important is the actual settings on the Routing tab, not the activity name.
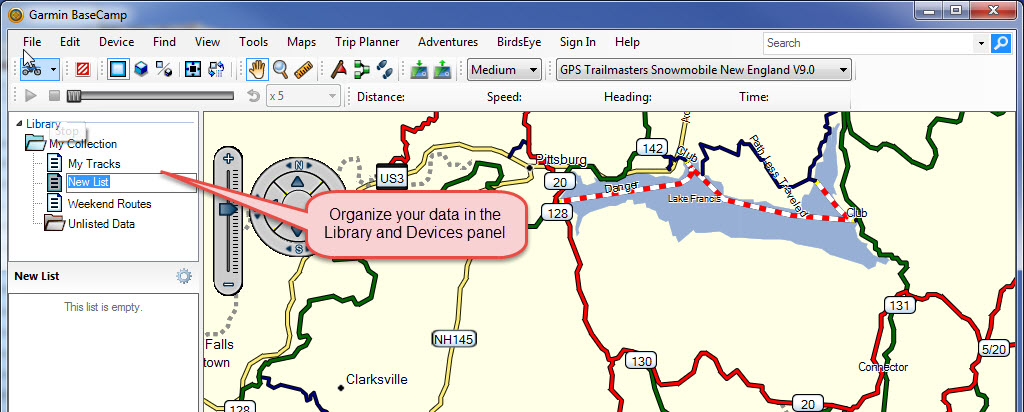
Now that you have your activity profiles setup you can begin your trip planning. You will need to select the map that provides the ATV or snowmobile trails. From the Maps menu, select either the GPS Trailmasters ATV map or the GPS Trailmasters Snowmobile map. Next you will need to create a place within BaseCamp to store the routes. In the upper portion of the Library and Devices area is where you will find lists under My Collection. To create a new list for your routes, click File -> New -> List. Enter the name of your new list. Make sure your new list is selected before creating a new route.
As Garmin continues to update the BaseCamp software, the way routes are created is being improved. There are actually three different ways to create a route for your trip.
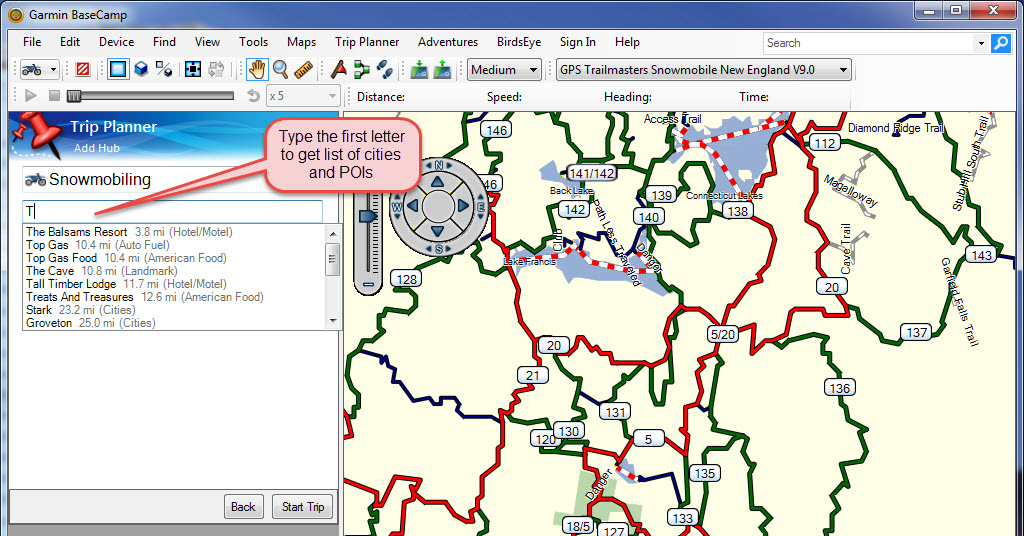
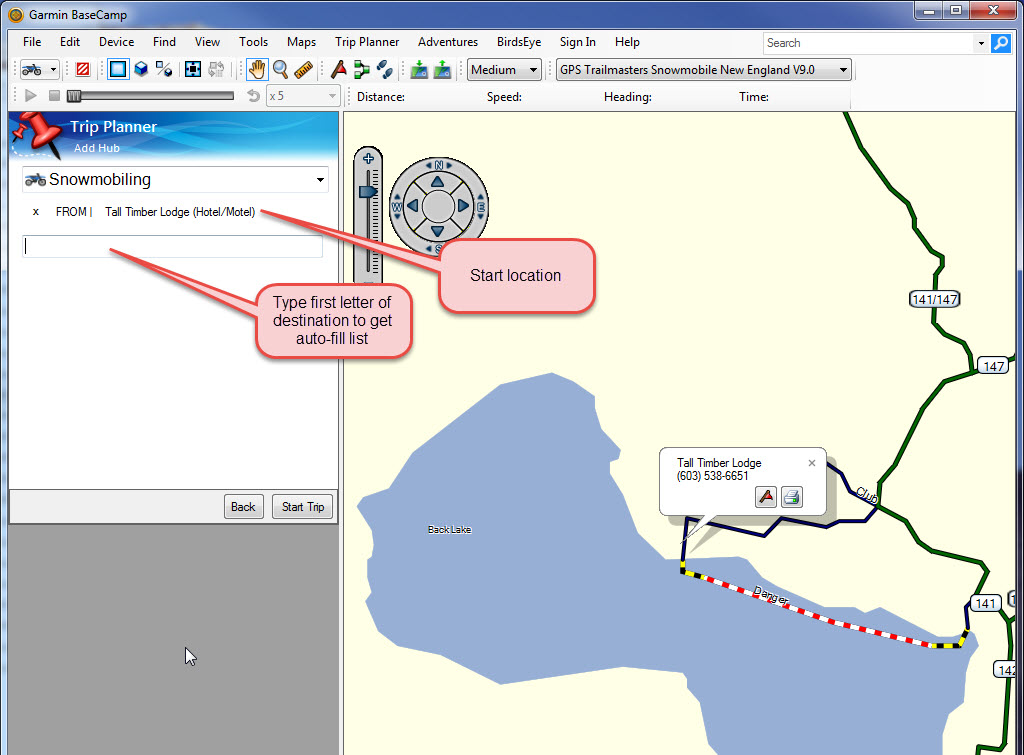
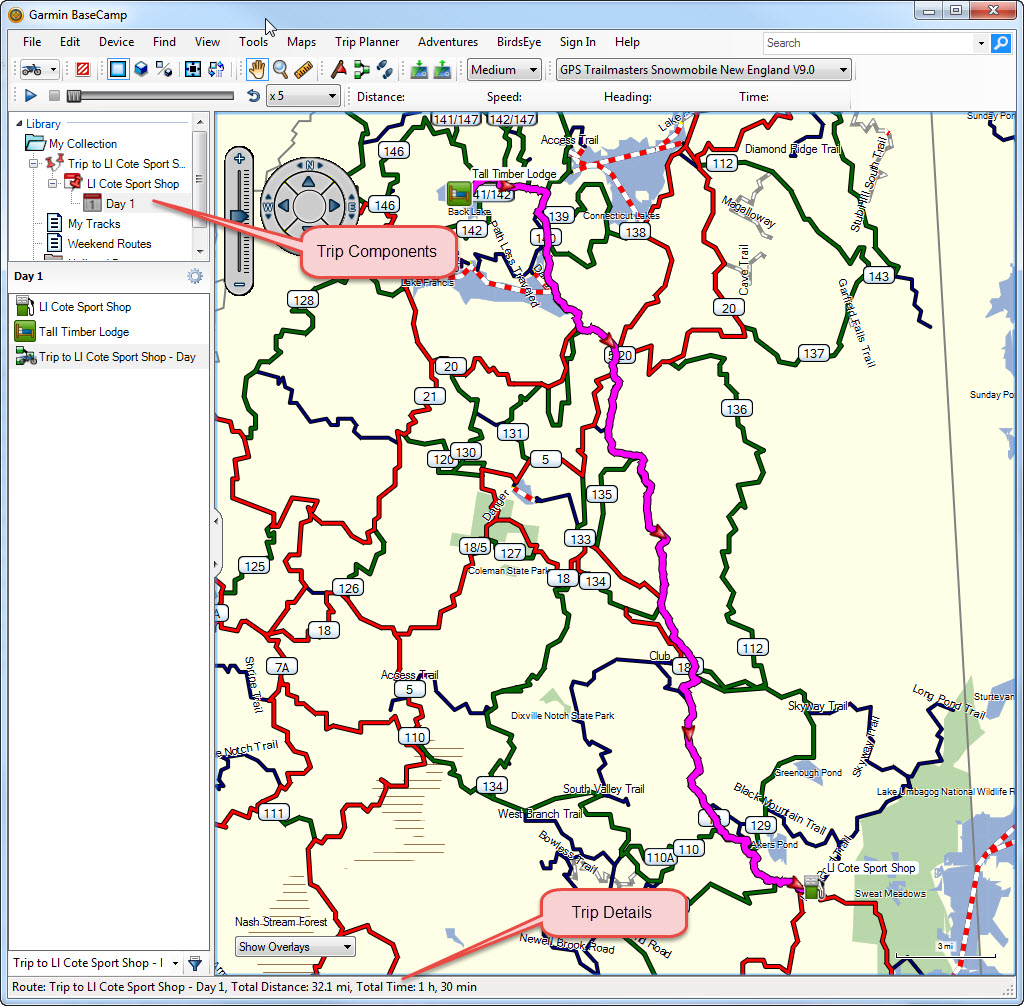
The Trip Planner tool is the first way. The Trip Planner tool is geared towards a very regimented multi-day trip but can be used nonetheless to plan your afternoon ATV or snowmobile trip as well. The Trip Planner will search cities and our trail accessible points of interest but it does so based on the area of the map that is displayed, so it is important to have the GPS Trailmasters trail map zoomed out just beyond the total trip area. From the main menu click Trip Planner -> New Trip. Make sure to uncheck the Round Trip attribute if your trip is one way. Click Continue and enter the Starting Location and the Destination. The tool will automatically search the city and POI database when you start typing in the Start or Destination box. For example, if you type ‘B’, the tool will pull up all locations in the area starting with the letter ‘B’. This can make it easier for you to enter your trip start and destination locations. After you have set the start and destination, click Start Trip. Your route will be automatically calculated using the Shortest Distance (based on your routing preferences). Click the Exit button at the very bottom of the panel or add additional days or points of interest along the planned route.
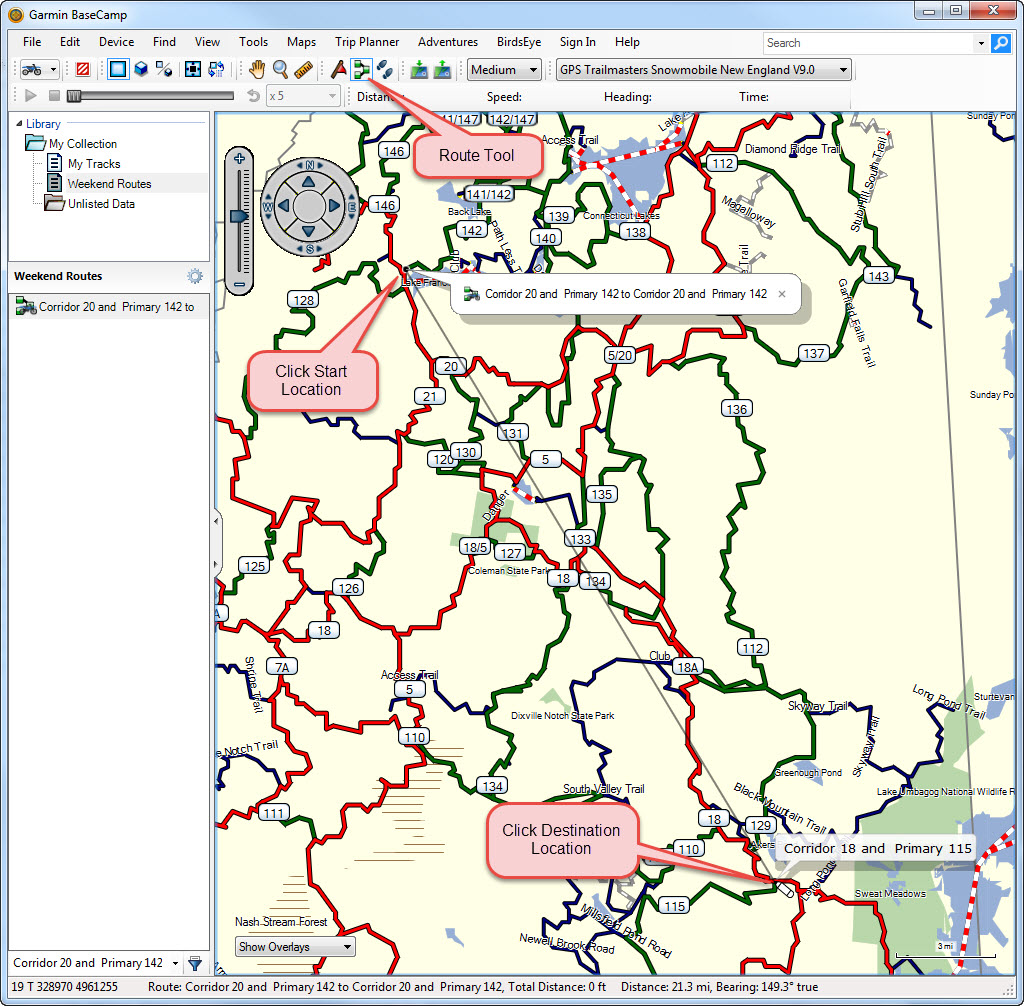
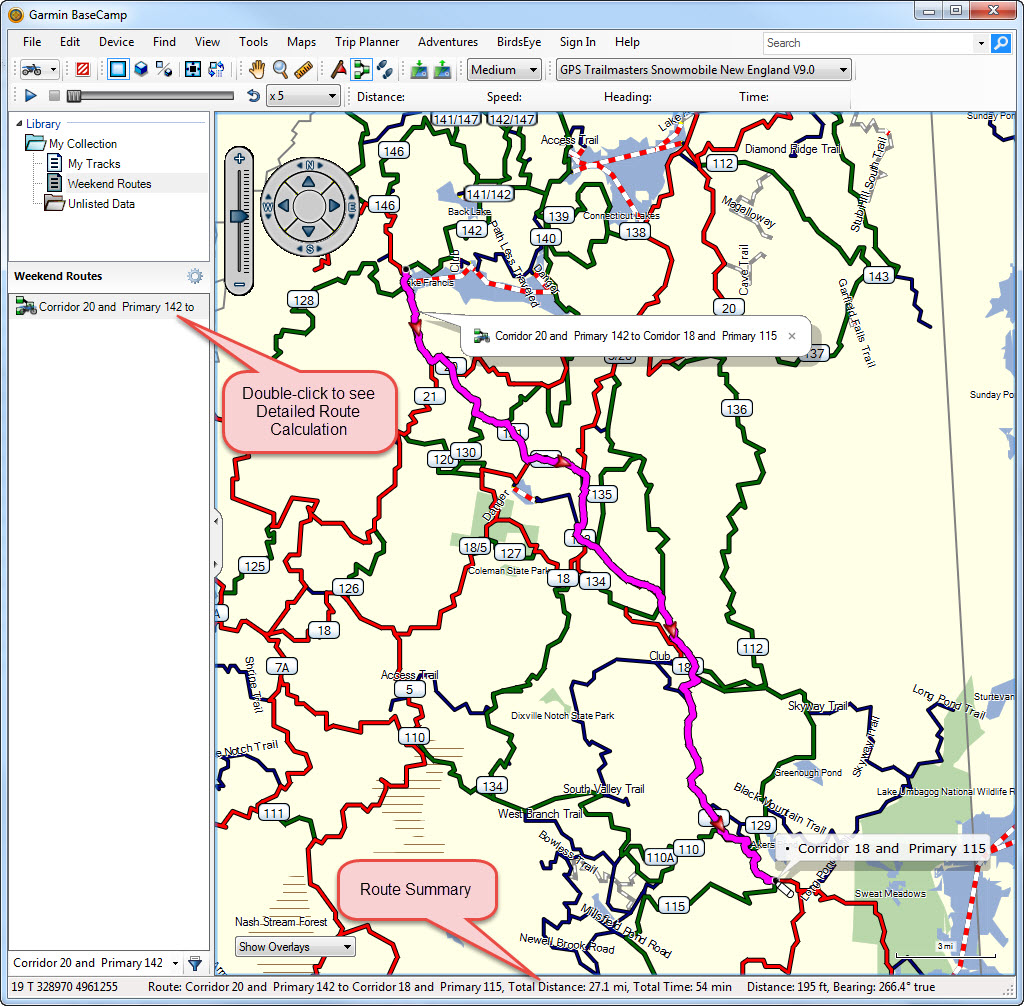
The second method is the Route Tool and is my preferred method for "rough" planning because it is quick and easy. From the main menu click Tools -> Route. The cursor will change to the Route tool pencil. Move the cursor to your start position and left-click the mouse. Move the cursor to drag the “rubber band” to the destination and left-click again. The shortest distance route will be calculated automatically. Terminate the route with a right-click of the mouse. You can force the route to follow a particular path by clicking on intermediary via points to your final destination. Right click the mouse to terminate the route. Your new route is displayed in the Library and Devices area under your My Collection list.
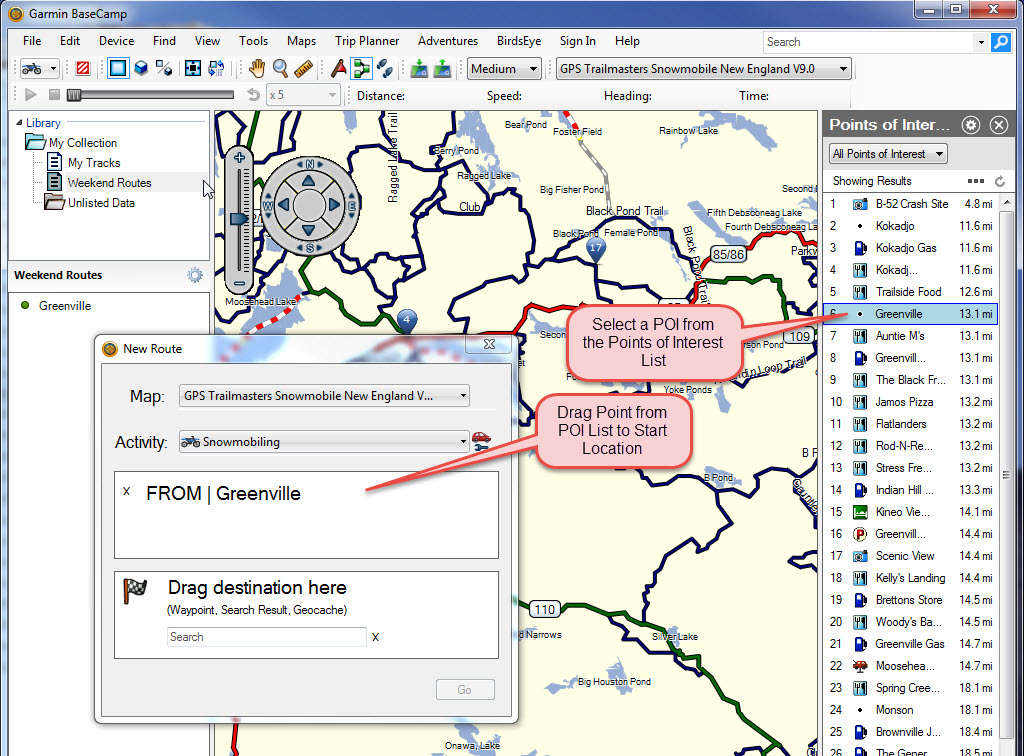
There is a third method that can be used with our trail map POI database which provides a popup dialog with a nice drag-n-drop interface for selecting the start point and destination. For this method, the map should be zoomed out to cover your total riding area. From the main menu click Find -> Find Point of Interest. This will result in a list of all available gas, food, lodging, parking points of interest and more to be displayed in the Search result panel on the right side of the window. From the main menu click Edit -> Create Route… You can drag start and destination points from the list of POIs to the New Route dialog. You can also begin to type in the Search boxes and a search for all POI and city matches will be performed. Select the desired point or city. This method also provides a quick way to select the ATV or Snowmobile map and the activity profile for calculating the route. Once the dialog is filled in click Go.
If your start point or destination is not in the POI database or a city on our map, you can create your own waypoints with the Waypoint tool and use them in your route.
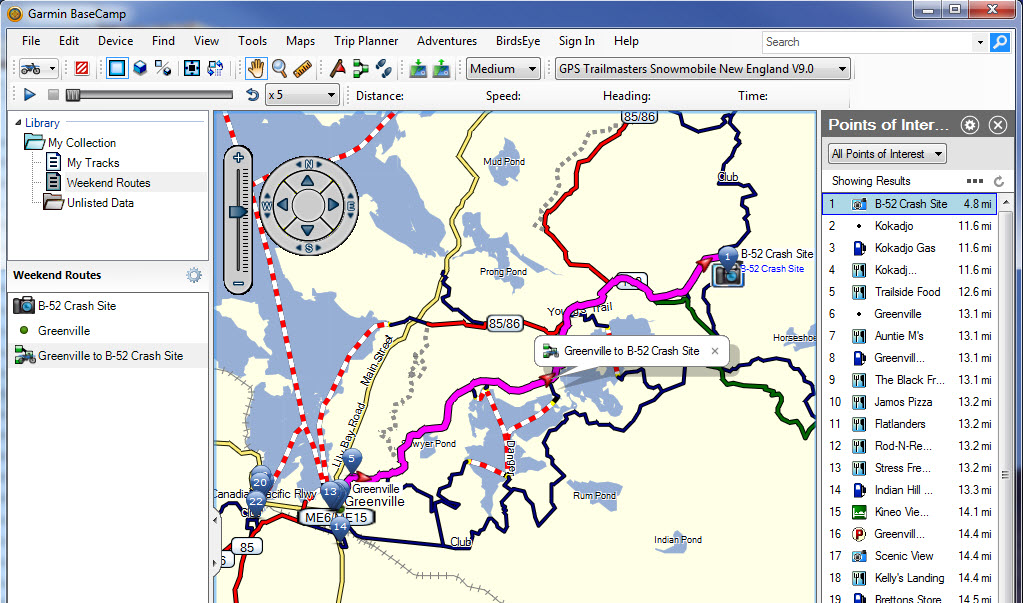
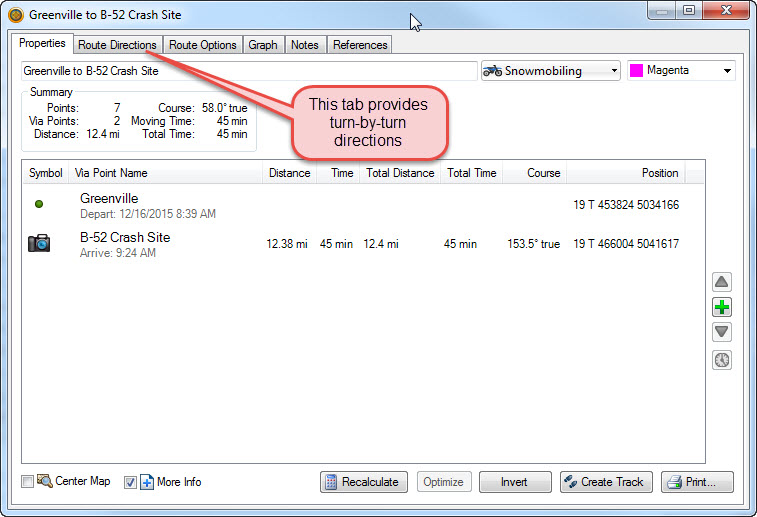
Regardless of the method used, your newly created route will be listed in the left-hand Library and Devices area within your My Collection list. There are a number of operations that can be performed on a newly created route. These options are presented when you select a route and right-click the mouse. You can easily delete a route if it’s not what you want or if you are just practicing. You can actually “play” the route, rename it, invert it, remove intermediary via point (called shaping points) if you have them. The most useful and interesting action you can perform on a route is examine the details. Double-click the route to see total distance and time. Remember, time is a loose number because of the speed limits assigned to trails, trail conditions, terrain and riding ability but can be used as a gauge. I usually multiply the Total Time by 1.2 for a more accurate time of arrival. Within the Route Directions tab, you can see each individual turn with distance and time in-between. The Properties tab and Route Directions tab are the most interesting. You can also modify the route here, change the display color, invert it and print out directions.
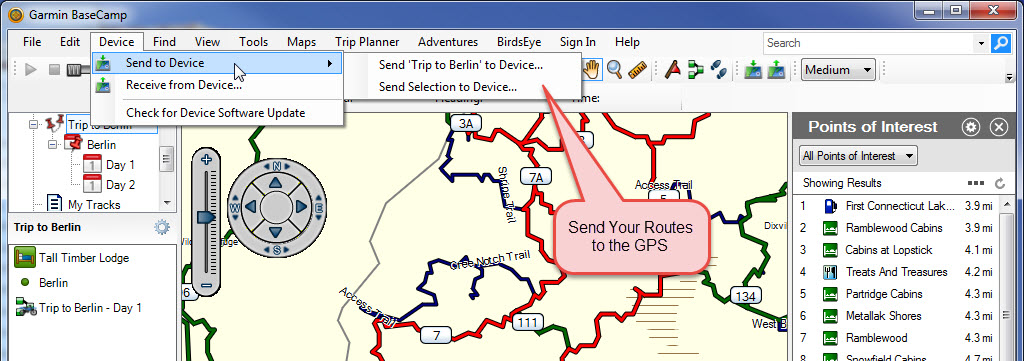
When you have a route that you now want to transfer to your GPS, select the route and then click Device -> Send to Device ->. You can send the entire My Collection list or just the selected route. Note: Not all GPS devices will accept a route from BaseCamp. Check the Garmin site for your model GPS to determine if it has “Trip Planning” capability. Depending on your GPS device the route will be accessible under the Route Planning App or possibly a category under “Where To”.
For additional route planning features enable additional toolbars. From the main menu click View -> Toolbars. Enable the Playback, Playback Info and Area Avoidances toolbars. The Playback and Playback Info toolbars can be used to simulate riding the route. It will show the speed, distance and time as the simulation arrow moves along the route. Remember that speed is assigned and not representative of how fast the trail can actually be ridden. The Area Avoidances tool can be used to select an area of the map to avoid – good for selecting an area where known logging is occurring or an area with poor riding conditions. Additional details regarding route planning can be found in the BaseCamp Help documentation and the online training videos.
Save Tracks and Waypoints
When you ride a trail with your GPS, it is collecting and recording the track. You also have the ability to mark places of interest while you are out on the trail, creating a waypoint that is saved in your GPS. These tracks and waypoints can be transfered from your GPS into BaseCamp where you can review them, rename them, share with others and store on your computer for future route planning. Managing your tracks and waypoints should be done on your computer using Garmin BaseCamp and not on your actual GPS. Note that when you transfer tracks and waypoints from your GPS to BaseCamp they are not deleted from your GPS and you will soon accumulate many potentially unwanted tracks and waypoints. Therefor once you have saved them on your computer, they should be deleted from your GPS (unless you want them of course). You can always transfer the ones you want back to the GPS from the computer using BaseCamp. From the main menu click Device. You have the option to Send data to your GPS device and Receive data from the device.
In addition to location, your tracks also contain time and elevation. Speed is calculated from the time values so you can plot the speed and elevation of your tracks. If you have 3D (elevation data) topographic maps on your computer you can see your tracks overlaid on the topo map in 3D view.
Geotag Photos
Your pictures can be geotagged within BaseCamp to show exactly where the picture was taken. Geotagged photos can be transferred to your GPS device with picture viewing capability and shared with your friends.
Create an Adventure
Garmin Adventures is an Internet community sharing application where you can swap trips with friends and share on social media. More about this later.
Garmin Custom Maps
If your GPS device supports Garmin Custom Maps you can transform paper maps and electronic maps into downloadable formats that can be transferred to your GPS. The process requires your map be georeferenced so it can be displayed at the proper location on the GPS. For a list of compatible devices and instructions to georeference your map using Google Earth see Garmin Custom Maps. - Watch our video on how to georeference the NERFC Snow Depth map.

